Alright, no T-bars this year. Let’s try it again…
Let’s try this again…
June 2, 2011Mole Wars… pt 1
July 6, 20107/6/10
Ahhhh. moles. The yard kind, not the face kind. The moles infiltrated my yard a few years ago. They came in via the neighbors yard. I watched his troubles for years not knowing that they were heading ….. my way. This year, they’re moving. I’ve been told that trapping is the only way to go but I’m going to attempt to make them move out before I result to killing them. First weapon of choice? GrubEx. I’m making an attempt to remove their food from my lawn.
This is what the side yard looks like now. I only have them in the side yard. The driveway blocks them from the rest of the yard. This is after I have already knocked down the mole hills. I would have saved them for the pictures if I would have thought about it but, you get the picture… right? 😉
I just put the GrubEx down this morning and I’m watering the crap out of the lawn right now. In a few days I’m going to get some lawn insect killer to kill all of their food. Stay tuned.
8/15/10
Well, getting rid of their food didn’t work. So, I borrowed a loop trap from a guy at work. Bingo! Worked like a charm. There was only one of those little guys in the side yard causing all of that damage. I would have thought there were more of them.
Now it looks as if a mole has entered my back yard via the farm field. I’m heading out to the hardware store today to pick up my own traps. We’ll see how well they work on this bunch.
I picked up the trap with the spikes. Set it a few times. I always find it tripped but no mole. I need a better trap.
8/23/10
Well, I went and picked up a loop trap on Saturday after work. I set the trap when I got home. Within 30min I had my back yard mole. I’ll never use any other trap then a loop trap for moles. I’ve had great results with mine.
Shitty Weekend
July 2, 2010Well, last weekend didn’t go so well. At least Saturday didn’t go so well. I had gotten a schedule change at work so I could have the day off. I had planned to go visit a friend of mine that I haven’t seen in a while. You know, backyard, beer and red meat. Well that all changed when I decided to do a little gardening that morning/afternoon.
The tomato plants were getting big enough to stake. When they get so big, I stake them to their cages because if I don’t, they will eventually pull the cages over. I use a t-bar and a hammer to do the staking. I only have 3 beefsteak tomato plants so this should have been a short job. Well, I got the first one staked up with no problem. While pounding the second stake/t-bar in to the ground, I hit something. It was about 10 inches down. There are 2 trees near the garden so I figured that they were roots. I figured wrong. Since I had made up my mind to drive through the root, I went and got my pole driver. This tool is used to drive metal fence posts. After three whacks with the pole driver, water started to bubble up around the t-bar. This is what I had so far. Click on the pics, they get bigger.
Then I started to smell it. It was sewage. I knew it couldn’t be mine because the garden is not in line with the pumping chamber and the mound. I went and got the neighbor for a second opinion. He said that sometimes sewage lines T off at the tank, branch out, then run to the mound/field. Well Shit! apparently that’s what mine does. So the fun starts.
I called the septic repair people… on a Saturday. He asked me what size pipe it was. I didn’t know. He asked if I could dig up around the pipe to see what size it was so he wouldn’t have to make a trip back to the shop. Time is money. So I gave that a shot. Can’t see the pipe. Too much muddy water filling up the hole I was digging. When he got here he had a pump that would pump solids. It would pump dirt as well as water. He cleared the hole in the ground and inspected the pipe. He had a piece of pipe on the truck. He replaced the busted section and was off to his next call. I filled the hole back in and weighed my options.
Well, after thinking about it for a while. I’m going to save 4 plants. The plants on the west side of the garden didn’t see any waste water. I’ve already pulled the rest out. Yesterday I hit the whole garden with a full bag of garden lime from TSC. If any of those 4 plants survive that, I’ll keep’em. I’ll hit it again with some more lime in a few weeks just to make sure. Now how fun was that.
Oh yea, the company I called was “Weiler Inc Plumbing-Heating-Ac” they did a fine job. Their phone number: (219) 462-5985.
Spring!
March 31, 2010It has begun. Winter crap is stored away and summer/spring crap has been drug out. Have to replace the burners in the grill. I can smell the ribs already….. I’ll be rebuilding another carburetor this year on a John Deer lawn tractor and possibly painting the house….maybe….if I have to.
How I make iced tea with a coffee maker
February 23, 2010Iced tea in a coffee maker. Right. I’m sure that tea fanatics would not stop screaming if they seen me doing this, so if you are one of those…stop reading now.
Fast easy iced tea in a coffee maker. I’ve used the Lipton Cold Brew tea bags but it’s not the same as regular tea bags. My grandmother had mentioned to me that her sister makes iced tea with her coffee maker. My grandmother makes iced tea on the stove top and uses 6 regular Lipton Tea Bags to make it. So I figured that I’d combine the two.
1 12 cup drip coffee maker
8 regular Lipton Black Tea, tea bags (regular tea)
1 Gallon pitcher
1 cup of sugar
Put a filter in the coffee maker like your making coffee. Cut open 6 tea bags and fill coffee filter with the contents of the tea bags…..(tea) 🙂 . Load the coffee maker with the tea and with water. Make tea. After the tea is done brewing, Remove craft/pot from burner. Fill the 1 gallon pitcher with ice and 1 cup of sugar. Pour tea from craft/pot into pitcher. Top off pitcher with cold water from kitchen faucet. Stir. Drink. Enjoy. Keep refrigerated.
Removing Super Glue
January 27, 2010This is a direct repost from this site. Just in case they go away.
From http://www.supergluecorp.com/removingsuperglue.html
“Super Glue is renowned the world over for the strength of its bonds, its versatility of use, and easy application. Whether a hole needs a seal or a crack needs repairing, Super Glue is the first thing that craftspersons, hobbyists, and contractors use for all their construction or repair needs.
Because Super Glue is so strong and bonds so fast, some people may find that they have accidentally glued two fingers together, or found that that small piece of balsa wood or plastic from a model they were building has completely bonded to their skin! Not to worry, for even though Super Glue is incredibly strong, it has one weakness: acetone.
Acetone is often found in household nail polish remover, and a small amount on the end of a Q-tip or cotton swab applied directly to the glue should dissolve the bond without damaging the skin. Be very cautious in gently peeling the skin apart as in removing a bandage from the skin; pulling the skin apart may rip the skin! Read the label to make sure that the remover actually contains acetone, as more and more manufacturers are turning away from the chemical because of the growing popularity of acrylic nails (which are loosened by acetone).
Be careful – straight acetone will discolor a number of fabrics and can mar the finish of laminated counter tops (mainly the darker colored ones). Straight Acetone defats the skin; wash with soap and water after use and apply hand lotion to replenish the skin and remove any dryness effects. Use acetone sparingly and cautiously with these tips in the following situations:
- Clothing/Fabrics
Use acetone and an old toothbrush, reapplying the acetone a number of times and brushing to remove it layer-by-layer. Work on outside and then on inside. May not come off entirely. - Counters, tables, floors, etc.
Use acetone to soften glue and then start working at the glue. Brush, scrape, shave, peel, sand or whatever mechanical means is available to work the glue off. Reapply acetone and continue to work at the glue. - Glass
Standard Super Glue is not recommended to be used for glass bonding applications. If bonded, soak in water until parts come apart.
The best suggestion is to properly cover your work area with metal foil before use – and always work with Super Glue and other adhesives in a well-ventilated area!
Should Super Glue bond to any body part where acetone should not be applied, such as the lips or eyes, the following steps will help you get out of any sticky situation!
- Skin
Immerse bonded areas in warm, soapy water. Peel or roll skin apart; a spatula or teaspoon handle or even a pencil will help. Remove cured adhesive with warm, soapy water (may take several applications). Fingernail polish remover with an acetone base has also been successful for removal of cured adhesive from skin. - Lips
If lips are accidentally stuck together, apply a generous amount of warm water and encourage maximum wetting and pressure from saliva from inside the mouth. Peel or roll (do not pull) lips apart. It is almost impossible to swallow the adhesive as a liquid. The adhesive solidifies upon contact with saliva (moisture) and could adhere to the inside of the mouth. Saliva will lift the adhesive in 1-2 days, avoid swallowing the adhesive after detachment. - Eyelid
In the event that eyelids are stuck together or bonded to the eyeball, wash thoroughly with warm water and apply a gauze patch. The eye will open without further action within 1-4 days. To our knowledge there has never been a documented case of adhesive in the eye causing permanent damage. Do not try to force eyes open. - Eyeball
The adhesive will attach itself to the eye protein and will disassociate from it over time, usually within several hours. Periods of weeping and double vision may be experienced until clearance is achieved. Use of a warmed 3% sodium bicarbonate solution to wash eyes repeatedly may assist in aiding more rapid removal of the adhesive.WE SUGGEST THAT ALL INCIDENTS OF EYE EXPOSURE TO CYANOACRYLATE ADHESIVE (SUPER GLUE) BE DISCUSSED WITH A PHYSICIAN.”
Christmas Tension…
December 6, 20095yr Old Front Load Washer Fails :(
October 20, 2009KENMORE ELITE HE3
Brand Name: Kenmore
Model Number: 11042822203
Heres my story. We bought an expensive front loading washer and dryer set about 5yrs ago. Efficient, expensive, pretty and better than the top loaders right? Not as far as I’m concerned. About a 2 weeks ago the washer started to make a noise like a freight train during the spin cycle. We have kept up the Sears full coverage insurance on the set so we called Sears. Oh and that insurance ain’t cheap. After dealing with a call center in a different country where English is not their first language, we got an appointment for a tech to come out. It’s not that I don’t like foreigners, it’s that when I’m calling from America, I want to speak to someone that I can understand. Anyway…. Tech comes out and says that the bearings are shot. Need a new drum and tub. He orders the parts and we are instructed to call and make another appointment when the parts get here. OK, parts get here and we make another fun call to the Sears International Call Center. It will be another 9 days. OK…I guess. What else am I going to do?
Nine days later the techs get here. The Sears technicians that I have dealt with in the past have always been very good and these guys were of the same caliber. They were very good at what they do. I got to talking to them while they were gutting my washer. I asked if this was a common problem with these front load washers. They said that it was. They said five years wasn’t too bad for one of these. Really? I asked them if they owned a front load washer. They both said no. hmmmm. OK, whatever. It didn’t cost me anything for this repair because I have the extra insurance. But, it would have cost me almost $1,200.00 if I didn’t have the coverage. Damn. They asked me if they could leave the drum and tub here. You know, so I could throw it away. I thought it was a little unprofessional but no problem. I’m glad they left it after seeing this: (watch the video)
Why Kenmore Front Load Washers Fail
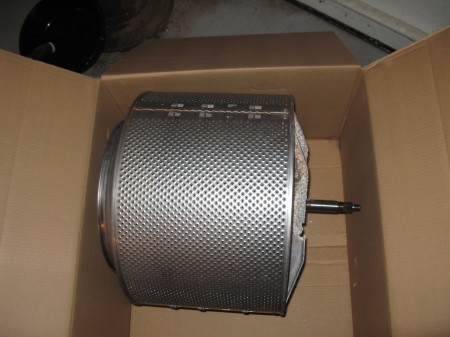
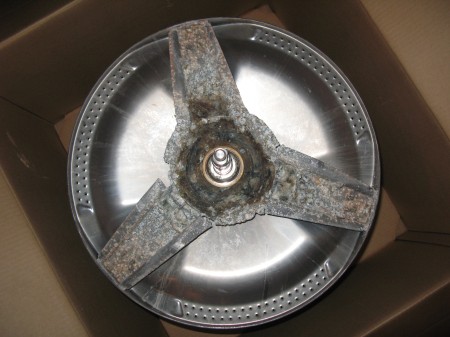
After seeing this, I went out and looked at the spider bracket on the back of the drum. Yep, it was chewed up and corroded. Two of the brackets arms were separated, completely corroded/broken through. That’s why it made such a racket during the spin cycle. Looks like I might have this problem again in about 4 – 6 years. Oh joy, I can’t wait. Looks like it’s an aluminum bracket on a stainless drum. Appears to be a corrosive combination. I’ll never buy a front load washer again. Search the net, they have design problems. I’ve included a few pictures of my drum below. Click on the pics to get a closer look.
Side view of the drum they removed.
The bottom two arms of the spider brackets three arms are so corroded that they broke. There’s a large chunk missing out of the bracket also.
A closeup of one of the corroded, broken arms.
A closeup of the other corroded, broked arm.
Another shot of the 5yr old bracket. Nice. This is under normal use. Nothing out of the ordinary. If you have one of these washers…. prepare yourself.
Craftsman Snow Blower Carb Rebuild
October 1, 2009The numbers off of the engine.
010801FD 120414 0131 E1
They are not always in the same place. On this one, they are on a plate attached to the engine. Pic below.
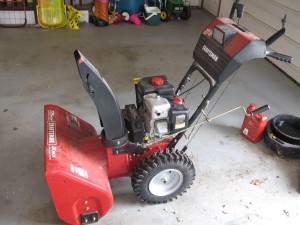
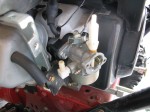
I removed all the plastic covering the carb. It’s almost like a puzzle. Removed the gas line, throttle cable, choke lever, the mount for the chute adjustment crank and a ground wire for the kill switch. Then it was just a matter of 2 screws. It was pretty straight forward. I inherited this machine and it needed some work. It sat in a garage for a few years unused and now it won’t start. It was only used a few times, so it’s practically new.
The carb was pretty gummed up. I took it to work, took it apart and let it soak in a parts cleaner for a few hours. It helped but I still had to use a wire brush, scotch brite and some probing tools to clean out some of the holes. I used a paper clip and a single bristle off of a wire brush to clean some of the passages. I cleaned it out the best I could with what I had. Went down to Riggs(219-462-4099) and got a few replacement parts. A new float, needle valve and seat gasket and bowel gasket.
Parts List: Briggs and Stratton Parts
- 693981 GASKET-FLOAT BOWL
- 398188 KIT-NEEDLE/SEAT
- 398187 FLOAT-CARBURETOR
Cost: $15.19 /w tax
Put it back together, installed the newly rebuilt carb and it runs like a champ. Started on the first pull. A few pics of the process. None of the actual rebuild though. First thing I”m doing is running some carb cleaner through it. I use Sea Foam.
Online Radio Station
September 23, 2009My favorite online radio station. It’s the ogg feed of course.
Hard Radio
Launch the link above and open with your favorite music player. I’ve found that Audacious works best. Don’t know why, but it does.


